Introduction to Core ML conversion tool
Earlier this month, at the WWDC 2017, Apple introduced a ton of new features, including, frameworks and APIs.
One, particularly, caught my attention, Core ML, that let you integrate trained machine learning models into your app.
The best feature about Core ML is that you don’t need to have any knowledge about neural networks or machine learning. You can simply use trained models1. There is currently a small set of CoreML models available on Apple’s dedicated website section.
But what if we want to use or create another model? Well, let’s see how!
A real example
In the session 703 (Introducing Core ML), the demo app was a flower 🌺 classifier, predicting the flower type based on an image of the flower.
I’ve immediately thought about PlantNet. It’s a French app that roughly does the same job. However, PlantNet requires an internet connection. The app sends the photo of the flower 🌼 to their server and you get a list of flowers alongside their match probability.
As I said, you need an internet connection to be able to use the app. But, if like me, you like to wander in the nature, you probably find yourself in a situation where you don’t have cellular data, and so, can’t identify the beautiful flowers 🌸 you encounter.
That’s where Core ML comes and solves this problem: the model is embedded on the device, so you don’t need anything else to make it work.
Well, let’s try to create our own flower 🌹 classifier!
Workflow
The traditional workflow to create a model from scratch and use it, can be roughly represented as below.
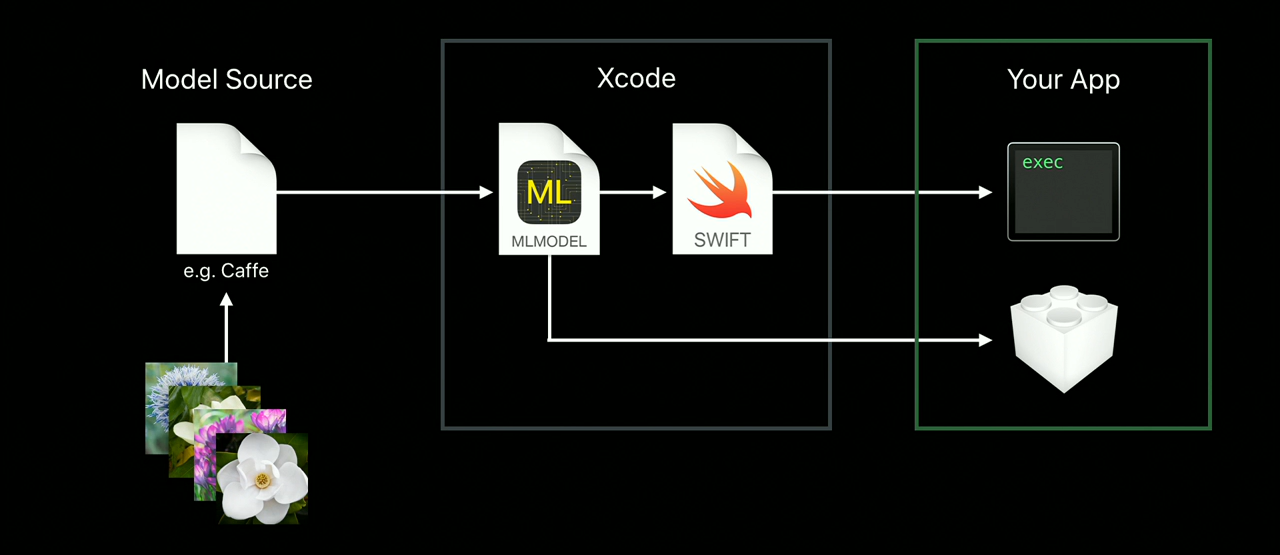
The final model is contained in a .mlmodel file. This is a new open file format that describes the layers in your model, the inputs and outputs, the class labels, and any preprocessing that needs to be done on the data. It also contains all the learned parameters (the weights and biases). Then we can simply load the .mlmodel in Xcode and start making predictions!
To make things easier, let’s assume we already have a Model Source, trained with data. There are tons of these models on the Internet. We can focus on the conversion part between the Model Source and the MLModel.
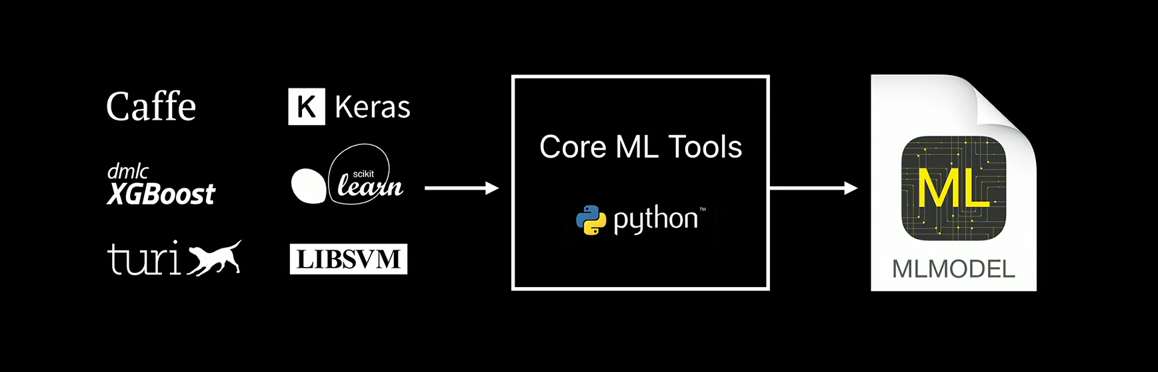
Conversion
In order to convert our trained model to the .mlmodel format, Apple released an open-source tool, coremltools (documentation is here).
The last part of the session 710 explains how to use it and convert a basic model. I used it as a base material, and I encourage you to watch it before continuing.
Getting the tools
Currently, coremltools requires Python 2.7. And because using Python on macOS is a real pain in the ass, we need to do a little workaround to be able to use coremltools. Otherwise you may run into meaningless errors (as I did) such as:
Fatal Python error: PyThreadState_Get: no current thread
I assume you already have pip installed.
1
2
3
pip install virtualenv
virtualenv --python=/usr/bin/python2.7 python27
source python27/bin/activate
-
Line 1: installs
virtualenv, allowing us to create separate environments, in our case, a Python environment -
Line 2: create the Python environment and a directory python27 in the current folder
-
Line 3: activates the environment
You can now check the current version of Python:
python --versionTo deactivate this environment, simple use:
deactivateNow, in our temporary Python environment, we can perform the installation.
pip install -U coremltoolsAnd you’re done! First part achieved 🎉
Getting ready
Now that we have the right tools installed, we need a model to convert! I chose to use a Caffe model, because it’s the one I know the best. In order to convert, we need:
-
a trained
.caffemodel -
a
.prototxt, describing the.caffemodel
For our flower classifier, I’ve chosen a model based on the Oxford 102 category flower dataset.
.caffemodel(~230Mb) can be downloaded here.prototxtcan be downloaded here- a list of labels (the flower’s name) can be downloaded here.
Let’s write the script to convert that!
Scripting
1
2
3
4
5
6
7
8
9
10
11
12
13
14
15
16
17
18
19
20
21
22
23
import coremltools

caffe_model = ('oxford102.caffemodel', 'deploy.prototxt')

labels = 'list.txt'

coreml_model = coremltools.converters.caffe.convert(
	caffe_model,
	class_labels=labels,
	image_input_names='data'
)


coreml_model.author = 'Gael Foppolo'
coreml_model.license = 'MIT'
coreml_model.short_description = "Guess the flower type"

coreml_model.input_description['data'] = 'Input image to be classified'

coreml_model.output_description['prob'] = 'Probability of each flower'
coreml_model.output_description['classLabel'] = 'Most likely flower on the image'

coreml_model.save('FlowerClassifier.mlmodel')
Let’s details what we do here:
-
Line 3: defining the Caffe model we would like to convert, using the
.prototxt -
Line 7: we use the function provided by
coremltools, using the model defined above ; we also provide the names of the flowers ; finally, the name of the input, here an image. -
Line 14–21: some customization, to display description in Xcode, when reading the
.mlmodelfile -
Line 23: save the model produced to a file
Save this to a .py file and run it:
python my-script.pyThis part can take some times (several minutes), depending on your computer. Grab a coffee or a cup of tea and chill 💅
Using the model
You should have a FlowerClassifier.mlmodel file! A working, offline PlantNet application! To try it out, I made a sample app.

This sample app and the script to convert the model are available on a GitHub repository! Drag your FlowerClassifier.mlmodel and you’re good!
Limitations
Core ML is great for quickly getting a model up and running in your app. However, there are some limitations due to simplicity:
-
only supervised machine learning is supported ; no unsupervised or reinforcement
-
no training on the device
-
the Core ML conversion tool is limited ; eg, TensorFlow is not supported ; but you can write your own conversion script
-
Core ML hides its logic ; whether it runs on the CPU or the GPU you don’t know ; and you can’t force it to run on GPU for example
Where to go next?
Now you have a model, it’s up to you use it! For example, using the new Vision framework to feed the model’s input with a live video stream from the camera!
-
A trained model is the result of applying a machine learning algorithm to a set of training data. ↩
Last updated on 19th August 2019