Let’s try Hadoop on AWS!
Recently, I started to get interested in Big Data & DevOps stuff thanks to a school project. There are a lot of resources out there and finding my way in it was complicated. I decided to start small, and scale my game day after day.
For each new project I take, I have a routine. I want to understand the grounding, how it works and get my hands dirty to see how the gears are moving, before going further.
So, first a lot of research, a lot of reading, taking some notes. Getting into the flow, embrace it. Then, organizing, bookmarking. Going deeper in the key subjects. And finally, try it, tweak it, understand it.
During this process, I document everything. Every piece of information that I find valuable is stored, classified. This way, I can keep the big picture in my head, and still have the information, how small it is, somewhere, accessible in seconds. Also this allows me to think to the next step: reproduce at larger scale, automatize, deploy.
This post is the result of this first step in the Big Data world. This post is intended to beginners, like me, that want to discover the Big Data world, with a practical example.
Getting started
I’m going to assume only a couple of things here:
- you know the basic components of Hadoop
- you know how to use SSH
- you have an AWS account
If you don’t have an AWS account, take a look at AWS Free Tier, you can test AWS services during a year, for free. No money will be required.
What will we do?
Now that we settle the requirements, here what we are going to do: a simple Hadoop cluster with 4 nodes, a master and three data nodes.
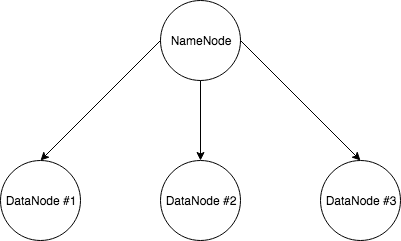
Let’s take a look at what we are going to do in details:
- setup & config instances on AWS
- setup & config a Hadoop cluster on these instances
- try our Hadoop cluster
Setup AWS instance
We are going to create an EC2 instance using the latest Ubuntu Server (at the time) as OS.
After logging on AWS, go to AWS Console, choose the EC2 service. On the EC2 Dashboard, click on Launch Instance. You can check Free tier only if you like (no cost, as promised). In the list select the latest Ubuntu Server. Currently, it’s 16.04 LTS.
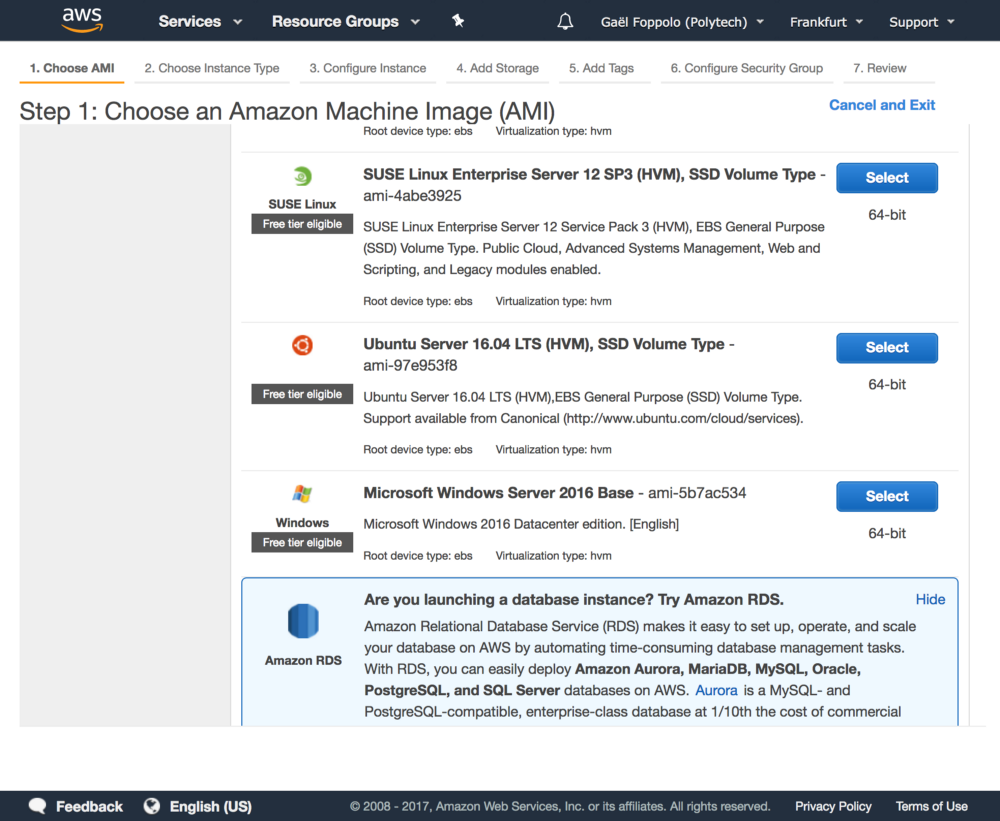
Choose the t2.micro instance type. It is enough for our purposes at the moment. Click on Next: Configure Instance Details.
Leave other options as they are. Click on Next: Add Storage.
Default is 8Gb, and it’s fine for our purpose at the moment. We can increase the size of the EBS volume later so that’s OK.
Click on Next: Add Tags.
A tag allows to identify an instance with a name. Click Add Tag, set the Key to Name and Value to Hadoop. We will use this tag to relabel our instances later on.
Click on Next: Configure Security Group.
This step lets us define rules regarding the incoming or outgoing access of the instances.
Select Create a new security group name it as you like (e.g.: HadoopSecurityGroup) and give it a useful description. For the purpose of testing, we are going to open everything to avoid network errors. Configure as the following image.
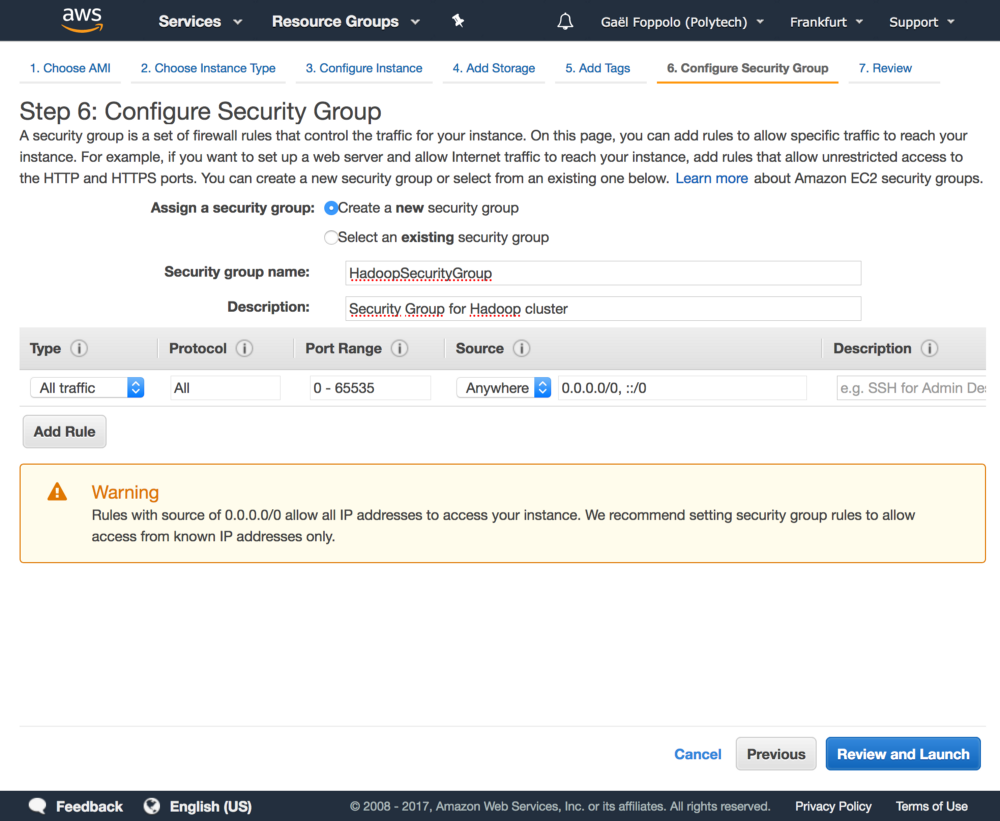
Finally, click on Review and Launch.
We need to create a key pair in order to connect to our instance securely, here through SSH.
Select Create a new key pair from the first dropbox, give a name to the key pair (eg: hadoopec2cluster) and download it. As mentioned on the AWS Console, we will not be able to download the file again after it’s created, so save it in a secure location.
Click on Launch. On the next page, you can directly click on View Instances. Wait until the status of the instance is running.
First connection
To connect to our instance we will use SSH. On the AWS Console, retrieve the Public DNS, should be something like: ec2–xx–xxx-xx-xxx.eu-central-1.compute.amazonaws.com.
The default user is ubuntu on Ubuntu AMI OS. You can either use a GUI client or a terminal to connect.
ssh -i path/to/your/key.pem ubuntu@ec2–xx–xxx-xx-xxx.eu-central-1.compute.amazonaws.comWe will also use scp to transfer files.
# download remote file to current local folder
scp -i key.pem ubuntu@<public DNS>:path/to/file .
# upload local file to remote folder
scp -i key.pem path/to/file ubuntu@<public DNS>:path/to/folder
And that’s it, you created and connected to your first EC2 instance on AWS! 🎉
Create our template
We are going to create a template instance, that we can replicate, and dodge the painless initial setup for each instance. Only what differs from master and slave will be left to do.
We already have a running instance, no need to create a new one. We will assume that this instance is the master. SSH into it and run the following commands.
In order to work, each node in the cluster must have Java and Hadoop installed.
sudo apt-get install default-jdk
wget [http://apache.crihan.fr/dist/hadoop/common/hadoop-2.8.2/hadoop-2.8.2.tar.gz](http://apache.crihan.fr/dist/hadoop/common/hadoop-2.8.2/hadoop-2.8.2.tar.gz)
sudo tar xzf hadoop-2.8.2.tar.gz
sudo mv hadoop-2.8.2 /usr/local/hadoop
sudo chown -R ubuntu /usr/local/hadoop/Why /usr/local/? The /usr/local hierarchy is used when installing software locally. It needs to be safe from being overwritten when the system software is updated. It may be used for programs and data that are shareable among a group of hosts. This is perfect for Hadoop.
Global configuration
Now that Hadoop is installed, we need to configure the global environment variables. Add the following to ~/.profile.
# Hadoop configuration
export JAVA_HOME=/usr/lib/jvm/java-1.8.0-openjdk-amd64
export PATH="PATH:JAVA_HOME/bin"
export HADOOP_HOME=/usr/local/hadoop
export PATH=PATH:HADOOP_HOME/bin
Finally, reload with: . .profile
Hadoop cluster configuration
This section will cover the Hadoop cluster configuration. Six main files must be configured in order to specify to Hadoop various configurations. Here we are going to configure it to launch in a fully distributed mode (multi nodes cluster).
Each file is located in the etc/hadoop folder of the Hadoop install folder.
For us the full path is : /usr/local/hadoop/etc/hadoop.
First, we modify hadoop-env.sh.
export JAVA_HOME=${JAVA_HOME}export JAVA_HOME=/usr/lib/jvm/java-1.8.0-openjdk-amd64core-site.xml
This file contains the configuration settings for Hadoop Core (eg I/O) that are common to HDFS and MapReduce. It also informs Hadoop daemon where NameNode (the master) runs in the cluster. So each node must have this file completed.
Replace these two lines with the next block, and complete the master’s private IP with your own (this instance if you remember).
    <configuration>
    </configuration>
<configuration>
<property>
<name>fs.default.name</name>
<value>hdfs://<master's_private_IP>:9000</value>
</property>
<property>
<name>hadoop.tmp.dir</name>
<value>/home/ubuntu/hadooptmp</value>
<description>A base for other temporary directories.</description>
</property>
</configuration>hdfs-site.xml
This file contains the configuration settings for HDFS daemons: the NameNode and the DataNodes. We can specify default block replication and permission checking on HDFS.
The replication value determine the number of each HDFS block being duplicated and distributed across the nodes in the cluster. Here we have 3 data nodes and we want to replicate data on each (maximum resilient) so we specify a factor of replication of 3.
The namenode and datanode folders will be created on respectively the master node and the slave nodes.
Replace these two lines with the next block.
    <configuration>
    </configuration>
<configuration>
<property>
<name>dfs.replication</name>
<value>3</value>
</property>
<property>
<name>dfs.namenode.name.dir</name>
<value>/usr/local/hadoop/hdfs/namenode</value>
</property>
<property>
<name>dfs.namenode.data.dir</name>
<value>/usr/local/hadoop/hdfs/datanode</value>
</property>
</configuration>mapred-site.xml
This file contains the configuration settings for MapReduce daemons: the job tracker and the task-trackers.
Since MapReduce v2, YARN became the default resource management system. YARN takes care of the resource management tasks that were performed by the MapReduce in the earlier version. This allows the MapReduce engine to take care of its own task, which is processing data.
First rename mapred-site.xml.template to mapred-site.xml. Replace these two lines with the next block, to specify YARN as the default resource management system.
    <configuration>
    </configuration>
<configuration>
<property>
<name>mapreduce.framework.name</name>
<value>yarn</value>
</property>
</configuration>yarn-site.xml
This file contains the configuration settings for YARN. Since we specify YARN as our default resource management system, we need to configure it.
The yarn.nodemanager.aux-services property tells NodeManagers that there will be an auxiliary service called mapreduce.shuffle that they need to implement. After we tell the NodeManagers to implement that service, we give it a class name as the means to implement that service. This particular configuration tells MapReduce how to do its shuffle. Because NodeManagers won’t shuffle data for a non-MapReduce job by default, we need to configure such a service for MapReduce.
Finally, we specify the private IP address of the master node (still this instance), which doesn’t change when the instances are restarted, so we don’t have to update these files each time we start the cluster.
Replace these two lines with the next block.
    <configuration>
    </configuration>
<configuration>
<property>
<name>yarn.nodemanager.aux-services</name>
<value>mapreduce_shuffle</value>
</property>
<property>
<name>yarn.nodemanager.auxservices.mapreduce.shuffle.class</name>
<value>org.apache.hadoop.mapred.ShuffleHandler</value>
</property>
<property>
<name>yarn.resourcemanager.hostname</name>
<value><master_private_IP></value>
<description>The hostname of the Ressource Manager.</description>
</property>
</configuration>SSH configuration
Before creating the AMI, we still have one step to do.
After the creation of the instances from the AMI, we will be able to connect to all our instances/nodes but the nodes themselves will not be able to communicate between them. Indeed, Hadoop and all the associate components (YARN, HDFS, etc.) communicate through SSH. We need to allow the master node (NameNode) to access to the slaves nodes (DataNode).
But accessing via SSH requires a password, so in order to avoid having to type the password for each SSH access to nodes in the cluster, we are going to set a password-less SSH access. Still on the master instance, type the following commands:
# generate keys file (public and private)
ssh-keygen -t rsa -P '' -f ~/.ssh/id_rsa
# add the public key in the list of the authorized keys
cat ~/.ssh/id_rsa.pub >> ~/.ssh/authorized_keys
# download the private key & remove it from the node
scp -i key.pem ubuntu@<public DNS>:~/.ssh/id_rsa .
rm ~/.ssh/id_rsa
Why remove the private key from the template? ☝️ Well, in our cluster, only the master talk to nodes, not nodes between themselves. Also, security purpose, if one data node is compromised, the attacker can’t gain access to the master node or at least, not this way.
We now have our template. We can create the image.
Create the actual AMI
Back on AWS Console, in the list of EC2 instances, select the instance, right click on it and select Create an image. Give a distinguish name and description to your instance and click Create Image. You can see your AMI (Amazon Machine Image) just like EC2 instances by clicking to AMIs on the left menu. Wait until the status of your image is available.
We now have our image. Let’s use it. Remember the cluster schema at the beginning? We need to create three instances from this AMI.
From the list of your AMIs, select the AMI and click Launch. You can then change the details like any instance before launching.
After the creation, rename the instances as follows:
- HadoopNameNode (Master)
- HadoopDataNode1 (Slave #1)
- HadoopDataNode2 (Slave #2)
- HaddopDataNode3 (Slave #3)
SSH config (again!)
As said earlier, the master node needs to communicate with the data nodes. We need to upload the private key (id_rsa) back on the master.
# upload the private key
scp -i key.pem id_rsa ubuntu@<public DNS master node>:~/.ssh/
Hadoop config
We are getting there, I promise! We only need to config some specific files and our cluster we’ll be ready!
The following files (masters and slaves) have to be created in /usr/local/hadoop/etc/hadoop. You can also scp to transfer the files easily.
-
masters: this file defines on which machines run the NameNode in our multi-node cluster. This is also here where we add the secondary NameNode -
slaves: this file defines on which machines run the DataNodes in our multi-node cluster.
Data Nodes
On the data nodes:
-
create the masters file and let it empty
-
create the slaves file and add the slave’s private IP of the current slave node
That’s it! 👉
Master Node
The following files (masters and slaves) have to be created in /usr/local/hadoop/etc/hadoop. You can also scp to transfer the files easily. On the master node:
-
create the masters file and add the master’s private IP in it
-
create the slaves file and add the slaves’ private IP in it, one per line, as a list
Formating HDFS
After all that configuration, it is now time to test drive the cluster. First, we need to format the HDFS file system on the NameNode. For the HDFS NameNode to start, it needs to initialize the directory where it will hold its data. The format process will use the value assigned to dfs.namenode.name.dir in etc/hadoop/hdfs-site.xml earlier. Formatting destroys everything in the directory and sets up a new file system.
/usr/local/hadoop/bin/hdfs namenode -formatDo this only once!
If everything is good, it should end with Exiting with status 0 and Shutting down NameNode.
Starting the cluster
Once formatting is successful, the HDFS and YARN services must be started.
/usr/local/hadoop/sbin/start-dfs.sh
/usr/local/hadoop/sbin/start-yarn.sh
And to stop them:
/usr/local/hadoop/sbin/stop-yarn.sh
/usr/local/hadoop/sbin/stop-dfs.sh
To test if everything is good, on each node use the command jps. On master node, you will see master’s process and on data nodes, you will see data’s process.
Run the test program
The moment you expect since the beginning. To test the installation, we can run the sample pi program that calculates the value of pi using a quasi-Monte Carlo method and MapReduce. The program takes two arguments, the number maps and the number of samples and submits a MapReduce job to YARN. Here an example:
hadoop jar /usr/local/hadoop/share/hadoop/mapreduce/hadoop-mapreduce-examples-2.8.2.jar pi 10 1000Change the jar path (version) according to yours.
You can also follow the job on the webpage. If the program worked correctly, the following should be displayed at the end of the program output stream:
Estimated value of Pi is 3.14250000000000000000The JAR file contains several sample applications to test the YARN installation. Simply use the following command to the full list:
hadoop jar /usr/local/hadoop/share/hadoop/mapreduce/hadoop-mapreduce-examples-2.8.2.jarYou can then follow the job in the terminal.
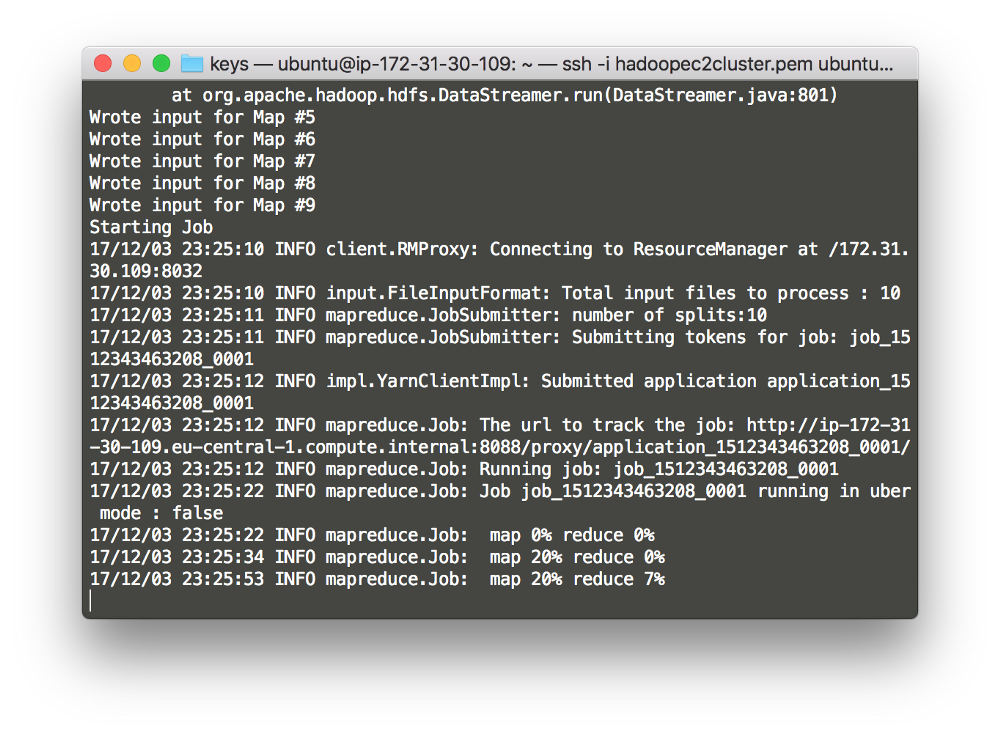
You can also see it in the browser by accessing: <public DNS master node>::8088
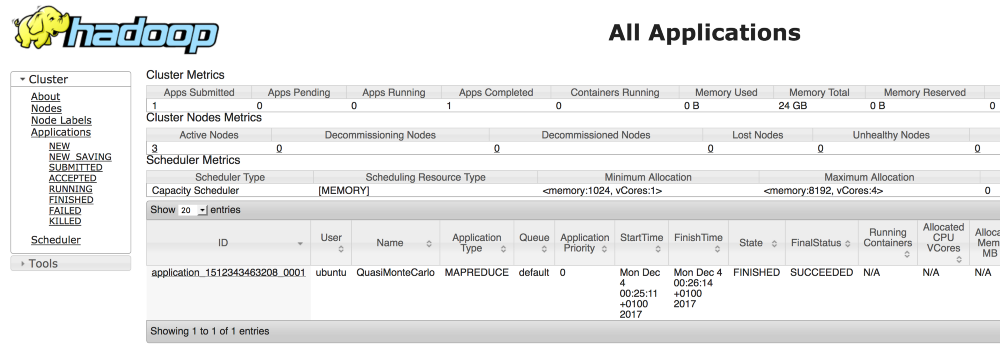
You can also view the job on data nodes, by accessing: <public DNS data node>:8042.
And that’s it! You did it, you have a basic, but running, Hadoop cluster! 🎉
Want another good news? You can stop and start your instances, the cluster will still work, without the need to update the configuration 🎉 Simply start/stop HDFS and YARN services and you’re good to go!
Conclusion
That was painful right? I know, but I think it’s the best way to learn a new tech, starting small, knowing exactly what you’re doing. Then iterate. How to improve, enhance. What can be added, modified, deleted. Review. Do it again.
Where to go next?
Well, the next step is automation. If we have a cluster with hundreds of instances, we can’t do this. This is not humanly possible. Also what if I want to add a new data node? What if I want to install my cluster elsewhere? How can I reproduce this install easily? How can I monitor the health of my cluster?
Is there a solution that can handle provisioning, managing, monitoring and deploying of Hadoop cluster for us?
Short answer, yes. Ambari. Long answer, maybe another time ✌️
Last updated on 02nd September 2019